Let me start off by saying there are lots of major events and goings on in my family this year. This Saturday, one of my cousins is getting married. In September, another of my cousins is getting married. Also in September, my cousin is having her first baby. In October, my husband's brother is getting married. And then of course next January is when our new baby is expected to arrive.
I wanted to find something to do for wedding gifts that would be special...but cheap. So, I decided to make a family recipe book.

The design for the book was inspired by
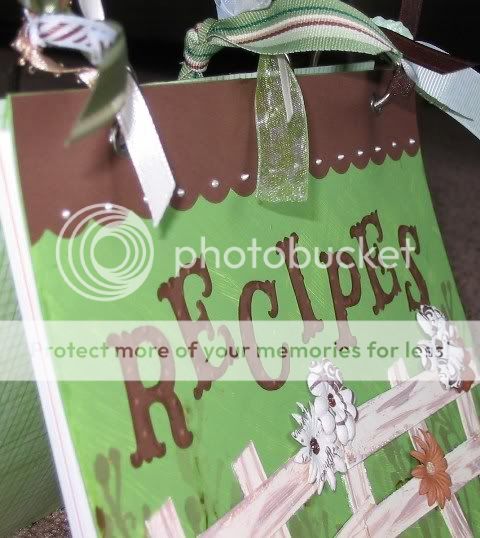
BBTB. I painted some plain chipboard sheets (cut a bit bigger than a half sheet) green and tried to give it a grassy effect. The part I was most inspired by on BBTB was the fence, so I wanted that to be a major part of my project. I cut some "fence" from chipboard and painted the pieces and antique white with some brown streaking for a weathered look. I was also loving the colors shown in the example on BBTB so I used green, brown, and shades of white as my palette.

I stamped the cover with different shades of brown ink using an Autumn Leaves clear stamp. and then attached the fence and some fun Primas. The centers of the Primas are done with Stickles or Liquid Pearls. There is a bit more Stickling on the fence and some Liquid Pearls along the top scallop on the front cover. The lettering is done with the new Cricut cartridge, Storybook! I am blessed enough to have some
wonderful friends who bought this for me from the
wonderful Hallmark Scrapbook as an early birthday present! (THANKS!) I used Distress Ink to make the letters stand out a bit more and Cuttlebugged them with the Swiss Dots embossing folder. I covered the inside of the front and back covers with some DCWV paper.

I used a fun border cut from the Storybook cartridge and topped it off with some Stickles for a fun accent on the back cover.
Okay, inside...

I did two title pages - one for "Main Dishes" and one for "Extras" (side dishes, desserts, etc.) I scanned in some of the recipes written by my Grandma and used that as a subtle background. I then used Distress Ink around the edges and added some beautiful corner cuts from, once again, Storybook. I love this cartridge! I added some Stickles on the corner cuts, but those don't show up too well in the picture.
I e-mailed and called folks in my family and asked them to give me some of their favorite recipes and formatted and printed those off on cardstock. I made each recipe page a half of an 8 1/2 x 11 sheet. I used my Crop-A-Dile to punch the holes for the rings.
I topped the whole project off with some eyelets courtesy of the Crop-A-Dile and some rings courtesy of a sweet RAK-er from the Cricut MB. I then went through my ribbon box with my daughter and we picked out some fun ribbons to "tie" the project all together.
I was very excited to have this project done just an hour or so before I needed to get it in the hands of the one who will be toting it to the wedding for me :o) Thanks for looking!
 Look out world! Everything with corners will now be rounded!


