Showing posts with label Altered. Show all posts

Wednesday, February 21, 2018

MISTI Sticker Replacement (and Hack!) - Original and Mini

Do you have a MISTI stamping tool, but aren't really a fan of the pink rulers? There are now replacement ruler stickers in a beautiful turquoise color (yay!) and although they are meant for your Original MISTI, you can make them work for your Mini MISTI, too. 

You can either watch the full video on YouTube, or just watch it right here:

Thanks for watching!
Royalty Free Music From: www.bensound.com

Wednesday, May 18, 2016

Altered Eyeglass Collaboration :: Seeing Stars

A while back, I was given the opportunity to join in with several other crafters and artists with a unique objective: use a pair of reading glasses in an altered art project.

If you've been reading my blog for long, you know that I've only dabbled a bit in mixed media and altered art - it's not my usual type of crafting. But...I love a challenge. I wanted to stretch myself and also put my style (which is generally more of a clean look) into the mix.
I received a pair of blue glasses with some light yellow accents, so I stuck with blue and yellow for my main color palette. I added stamping (both with ink and paint) and some die cuts to my project.
 I finished it all off with a handwritten title: seeing stars.
I had so much fun joining in on this collaboration and loved seeing what everyone else came up with. A few of those involved are sharing their projects on their blogs - so be sure to stop by and check out the other projects from: Tina (the one behind the whole idea), Keri, and Susan.

Thanks for stopping by!
Supplies:
Paint: Plaid (Apple Barrel - Parrot Blue, Bimini Blue, Ivory, Yellow Flame, White);

Other: Plaid (Mod Podge - Matte);
Stamps: Unity Stamp Company (Sweet Summer Love, Wood Grain Script);
Ink: Ranger (Archival - Jet Black);
Dies: My Favorite Things (Lucky Stars);
Cardstock:
Other: (Canvas);

Friday, April 22, 2016

Upcycled Notebooks {The Twinery}

It's Earth Week and in the spirit of reducingreusing, and recycling I've got some quick & easy upcycled notebooks to share with you today. 
I started by taking some empty boxes with fun, colorful designs and I cut them to a variety of sizes (making sure to have both a front and back of the same size for each notebook). Cereal boxes and snack boxes are a great to way get chipboard for a variety of crafting projects.

I put lined notebook paper inside, but this is also a great project for those printing mistakes and other projects that are ending up in your "scratch paper" pile.
To keep these notebooks together, I tied them up with The Twinery's Solid NaturalSolid PeapodSolid Charcoal, and Solid Denim twines.

These are fun to make and are easy enough for kids to do. These would be great for kids' parties, too - just take something like a LEGO box and cut it to size for a great LEGO party favor. These can also be used like mini albums (just fill them with pictures instead of paper).
So many different ideas and they will get you looking at everyday boxes in a new way!
Supplies: 
Twine: The Twinery (Solid Natural, Solid Peapod, Solid Charcoal, Solid Denim); 
Tools: Fiskars (Trimmer, Scissors); Scor-Pal (Scoring Board);

Friday, February 26, 2016

Distressed Foil Embellished Onesies {The Twinery}

Today I've got a fun project to share with you...distressed foil embellished onesies!
Foil is so popular right now, and I love the fact that it can be applied to fabric. I wanted to create a fun gift for two of my newest nieces, and I thought decorated onesies would be perfect. My sisters-in-law like vintage and/or shabby chic styles, so distressing on the hearts was the perfect look.
This may look like a difficult and time-consuming project, but it really wasn't. In fact, it went something like this:

Step One: Punch shapes from Hot Melt Adhesive.
*Step Two: Feed the kids.
Step Three: Iron Hot Melt Adhesive punched shapes onto onesies.
*Step Four: Change a diaper.
Step Five: Iron Deco Foil onto onesies.
*Step Six: Put baby down for nap.
Step Seven: Peel back  to reveal finished design.
*Step Eight: Think to yourself, "Wait...you're not finished. These are cute. You should make one for your own baby."
*Step Nine: Repeat steps one through seven.

*Some steps may not apply to all crafters. Feel free to insert a chocolate break instead.
To get that fun, distressed look, I simply set the iron to a higher temperature than was recommended on the package when ironing on the foil. (It will dull some of the high shine of the foil and alter the amount of adhesion, so you will only want to do this if you are wanting the distressed look.)
After I created the onesies for my nieces, I went back and made another onesie, this time choosing a star embellishment for a "little sheriff" look.  

And, of course, no gift is complete without being tied up with The Twinery's fabulous twine! I chose Solid Lilac and Solid Peapod for the heart onesies, and Copper Shimmer twine for the star onesie.

If you are looking to do a distressed foil look on paper, that is possible, too. Simply place parchment paper over the foiled image (after you've peeled the transfer sheet off), and use firm pressure with an iron, being sure to move it back and forth. This will wrinkle and dull the foil - a perfect distressed look!

Before you go...I don't mean to alarm you, but it's come to my attention that some people are using irons for things other than craft projects. I just felt the need to spread the word incase you come in contact with one of these people. They are out there.

Thanks for stopping by!
Supplies: 
Transfer Foil: Therm O Web (Deco Foil - various colors);
Twine: The Twinery (Solid Peapod, Solid Lilac, Copper Shimmer); 
 Tools: Fiskars (Squeeze Punches, Scissors);

Friday, March 27, 2015

LEGO Brick Necklace Tutorial {& Fiskafriends Blog Hop}

The Introduction:
If you are hopping along with us today: You should have come here from Cindy deRosier's blog. If you did, you are in the right place! Welcome!
If you aren't already a follower, I'd love to have you follow my blog!
If you are on Facebook, please "like" Ink Blots by TRD.

If you are one of my regular readers: Thanks for coming back! I love having you! Please feel free to join along in the hop - you can start at the Fiskafriends blog.

The Hop Order:
You can find the full blog hop order on the Fiskafriends blog.

The Project:
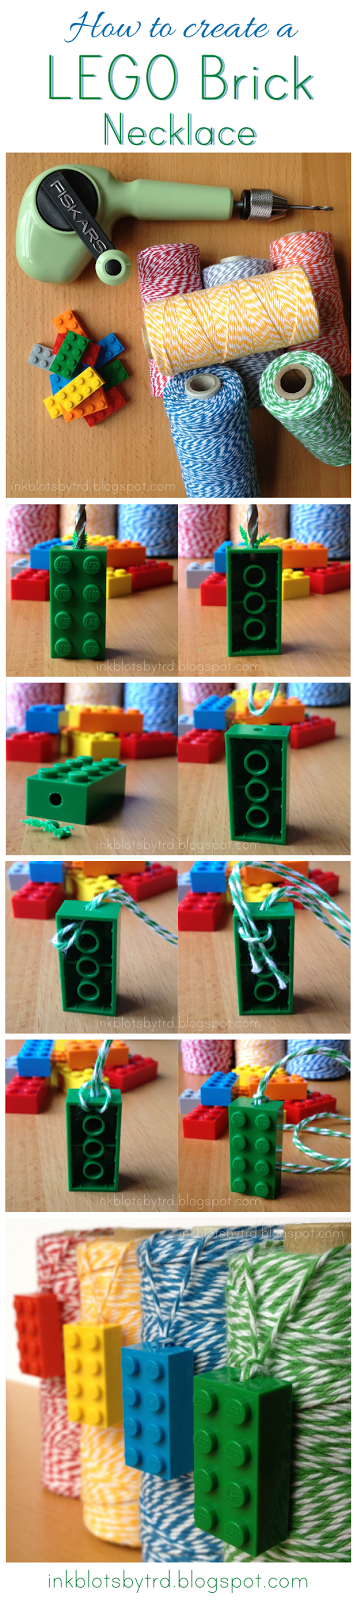
I was able to attend a few Fiskateer events and at one of them we created LEGO necklaces. One of my sons recently had a LEGO themed birthday party and LEGO brick necklaces were the perfect addition to the goodie bags.

With a Fiskars craft drill, these necklaces take less than a minute each to create:
Simply drill through one side of the LEGO brick, thread with twine, and you are done!

My Prize:
In addition to the sponsored prizes that are up for grabs, I've decided to host a little giveaway of my own! (Just add LEGO bricks and you can make LEGO necklaces, too!)
The winner will receive:
- a Fiskars craft drill
- a spool of Mandarin twine
- a spool of Peapod twine

To enter:
  • Leave a comment on this blog post. That's it!
If you would like additional chances to win you can do so in one (or all) of the following ways:
  • Follow this blog. {Please let me know you are a follower by leaving an additional comment.} 
  • "Like" InkBlotsbyTRD on Facebook. {Please let me know you are a follower by leaving an additional comment.}
  • Share about this giveaway on your own blog, Facebook, Pinterest, Google+, Twitter, or anywhere else. {Please let me know where you've shared by leaving one additional comment.}
Blog comments for my giveaway will close Sunday, March 29th @ 11:59pm (Pacific) and the winner will be announced Tuesday, March 31st here on my blog.
Please remember to check back here to see if you've won.
{The winner will have 72 hours to contact me with their information.}
{Due to shipping costs, my giveaways are available to US mailing addresses only.}

Sponsored Prizes:
You can find details about the sponsored prizes (and how to win them!) on the Fiskafriends blog.

{Note: Only one comment per person on this post will be counted for the sponsor prize. The additional comments will count only for my personal giveaway.}


Thanks for stopping by today!

The Next Stop:

Supplies: 
Twine: The Twinery;
Tools: Fiskars (Craft Drill, Scissors);

Other: LEGO (Bricks);

Friday, May 2, 2014

Paper Bag Journals {The Twinery}


Today I am over on The Twinery's blog sharing these fun little journals:
Please be sure to head on over and check it out!

Thanks for stopping by today!
{PS - Stay tuned for my Lupus Awareness Month giveaway. Check back here on Tuesday.}

Supplies:
Paper Bag: (5 1/4" wide x 10 1/2" tall x 3 1/2" gusset);
Washi Tape: My Mind's Eye (listed in order from top to bottom: Now & Then: Milo, Cut & Paste: Adorbs, Cut & Paste: Adorbs, Yellow Polka Dot, Now & Then: Milo, Cut & Paste: Presh, Teal Houndstooth, Yellow Arrows);
Twine: The Twinery (Solid Natural);
Tools: Fiskars (Trimmer, Scissors); Scor-Pal (Scoring Board);

Thursday, April 19, 2012

Blog Hop {The Twinery & Imaginisce}


The Introduction:
If you are hopping along with us today: You should have come here from Mary Anne Jenkins' blog. If you did, you are in the right place! Welcome!
If you aren't already a follower, I'd love to have you follow my blog!

If you are one of my regular readers: Thanks for coming back! I love having you! Please join along in the hop - you can start at The Twinery's blog.

The Prizes:
The Twinery is giving away three {I Dream in Twine} Sampler Packs ($32 retail value).


Imaginisce is giving their Makin' Waves collection to three lucky winners.


The Details:
Leave a comment on each blog along the hop.
Blog comments close on Sunday, April 22nd at 11:59pm (EDT) and the winners will be announced on The Twinery's blog and the Imaginisce blog.

The Project:

I have a board on Pinterest where I gather some "words of wisdom", but I wanted a place to keep some great quotes that might not be found online. There are a lot of great books out there and I often come across a quote that resonates with me - so I wanted a special journal where I could write them down and be able to easily look back on them later.


For this project I took a basic black journal and jazzed it up with some patterned papers from the Sole Sisters collection by Imaginisce. I can't deny that I love a basic black and white houndstooth - that paper immediately stuck out to me and I knew I had to use it. I added in a couple other patterned papers from the collection and arranged them on the front of my journal.


I wrapped some Charcoal and Buttercream twine from The Twinery around the journal cover and finished it off with a fun double bow.

This project is great for making your own personalized journals and is also perfect if you would like to give a handmade gift for an upcoming holiday (think Mother's Day!).

Thanks for stopping by today!

The Next Stop:
Ilene Tell's blog


Supplies:
Twine: The Twinery (Charcoal, Buttercream);
Patterned Paper: Imaginisce (Sole Sisters);
Stickers: Prima Marketing (Almanac Collection - Alphabet);
Other: Journal;
Tools: Fiskars (Trimmer, Scissors); Scor-Pal (Scoring Board);


Saturday, February 11, 2012

Vintage Valentine {May Arts}


I created this container for the recent Vintage Valentine Challenge from May Arts. I used all four ribbons on my container - three were tied in bows which were then layered to create one big bow on the front and the remaining pink ribbon was then rolled to create the three little roses.


The paper is from Authentique Paper's new (not yet released) Delightful collection and I added in a few of the new cardstock stickers as well - the scallop border strip and the "Lovely" ticket.

I added in a few vintage mini playing cards to complete the look.

Thanks for stopping by - and please go vote (for me...if you'd like!) on the challenge entries.

Supplies:
Patterned Paper: Authentique Paper (Delightful Collection);
Stickers: Authentique Paper (Delightful Collection);
Ribbon: May Arts;
Other: Vintage Mini Playing Cards;
Tools: Fiskars (Trimmer, Scissors); Martha Stewart/EK Success (Scoring Board);


Monday, February 6, 2012

Hello Lovey {Market Street Stamps}

{As seen today on the Market Street Stamps blog}


Although my first love (as far as paper crafting goes) is making cards, I do love to break out and try something new every once in awhile.

With Valentine's Day coming up fast (and Easter not far behind) I thought it would be good to test out the new Birds of a Feather set from Market Street Stamps and see what I could come up with for a quick gift container.


These gift containers were actually from the office supply aisle in WalMart (originally containing clips, push pins, etc.). I thought they were a great size for a small treat. (Wouldn't conversation hearts look great in these?)

{Tip: If you are going to put any sort of food in your container you will want to make sure it is a food safe container or line it with a small food safe lining or bag.}


Everything on the box started as a plain white piece of cardstock.

•For the band around the container, I randomly stamped a few of the sentiments/images from the Birds of a Feather set (Open heart, filled heart, "Hello Lovey", and "Love")- either in Tuxedo Black or Pear Tart ink. I cut the cardstock into strips and added some dots with a Copic marker.

•For the layer behind the stamped chick, I simply swiped my pad of Pear Tart ink across a plain white sheet of cardstock until it was saturated enough for the look I was going for, and then cut it to size. (This is a very quick way to make sure you have a cardstock that matches the ink you are stamping with.)

•Each little chick was stamped in Tuxedo Black ink and was given a pop pf color by coloring the little hearts with a Copic marker.


I adhered the band and the layered image to the container, topped it off with some of The Twinery's twine...and now I have two containers ready to fill with a sweet treat.
{Bonus: These will look perfect for both Valentine's Day AND Easter.}

Thanks for stopping by today!


Supplies:
Cardstock: Georgia Pacific (White);
Stamps: Market Street Stamps (Birds of a Feather);
Ink: Memento (Tuxedo Black, Pear Tart);
Twine: The Twinery (Caribbean, Honeydew, Cantaloupe);
Markers: Copic (YR12, BG15);
Other: Clear Container;
Tools: Fiskars (Trimmer, Scissors); Scor-Pal (Scoring Board);