Showing posts with label Kids Crafting. Show all posts

Friday, May 19, 2017

Introducing...Stamp Club (Summer Edition) from Ink Blot Shop, LLC!

Looking for something to keep the kids busy while school is out for the summer?

Each Monthly Kit* Includes:
- One (1) 4x6 Clear Stamp Set
- Two (2) Washable Ink Pads
- Two (2) Clear Stamp Mounting Blocks
- Two (2) Rolls of Washi Tape
- Two (2) White Cardstock Card Bases
- Ten (10) Quarter-Sheet Cardstock Panels
- Supplies and instructions to make a total of at least 1 card and 1 non-card project
(May Kit pictured)

Starter Kit* Includes:
- One (1) 4x6 Clear Stamp Sentiment Set
- One (1) Washable Black Ink Pad
- One (1) Clear Stamp Mounting Block
- One (1) Roll of Washi Tape
- Two (2) White Cardstock Card Bases
- Two (2) Quarter-Sheet Cardstock Panels

To get all the details - head on over to the Stamp Club subscription page.

Friday, September 9, 2016

Need a necklace? No problem! {The Twinery}

It's no secret that I love using twine. I use it for crafting, of course, but I also love to use it for quick and easy jewelry. (You can see some past jewelry projects I've done with twine here, here, here, and here.) I love using The Twinery's twine for jewelry because it is so soft and lightweight, and it adds a great pop of color.
Recently I was looking for a last minute addition to my outfit, so I simply grabbed my spool of Solid Mandarin twine and went to work. I started with three strands of twine, knotted it in several places along the middle section and then braided both ends. I made it extra long so that I can also wrap it around a couple times as a super skinny belt, but love using it as a multi-strand necklace as well. 

With so many colors of twine available from The Twinery's shop, I've got lots of options for additions to future outfits...and you do, too!

Tuesday, August 2, 2016

Review :: Monster Colors Sensory Tub

If you've got kids who love to keep their hands busy, be sure to check out the Monster Colors Sensory Tub. To really appreciate how much is in the bag (a "tub" is not included), you just need to see it in action. I wanted to share an unboxing (unbagging?) video, so here it is:

Cool, huh? My kids love digging in and playing with all the various bits and pieces. 

Enjoy!
FTC Declaration: I received a complimentary package of this product. This does not change the fact that I will give my honest opinion in my reviews.

Friday, April 22, 2016

Upcycled Notebooks {The Twinery}

It's Earth Week and in the spirit of reducingreusing, and recycling I've got some quick & easy upcycled notebooks to share with you today. 
I started by taking some empty boxes with fun, colorful designs and I cut them to a variety of sizes (making sure to have both a front and back of the same size for each notebook). Cereal boxes and snack boxes are a great to way get chipboard for a variety of crafting projects.

I put lined notebook paper inside, but this is also a great project for those printing mistakes and other projects that are ending up in your "scratch paper" pile.
To keep these notebooks together, I tied them up with The Twinery's Solid NaturalSolid PeapodSolid Charcoal, and Solid Denim twines.

These are fun to make and are easy enough for kids to do. These would be great for kids' parties, too - just take something like a LEGO box and cut it to size for a great LEGO party favor. These can also be used like mini albums (just fill them with pictures instead of paper).
So many different ideas and they will get you looking at everyday boxes in a new way!
Supplies: 
Twine: The Twinery (Solid Natural, Solid Peapod, Solid Charcoal, Solid Denim); 
Tools: Fiskars (Trimmer, Scissors); Scor-Pal (Scoring Board);

Friday, March 27, 2015

LEGO Brick Necklace Tutorial {& Fiskafriends Blog Hop}

The Introduction:
If you are hopping along with us today: You should have come here from Cindy deRosier's blog. If you did, you are in the right place! Welcome!
If you aren't already a follower, I'd love to have you follow my blog!
If you are on Facebook, please "like" Ink Blots by TRD.

If you are one of my regular readers: Thanks for coming back! I love having you! Please feel free to join along in the hop - you can start at the Fiskafriends blog.

The Hop Order:
You can find the full blog hop order on the Fiskafriends blog.

The Project:
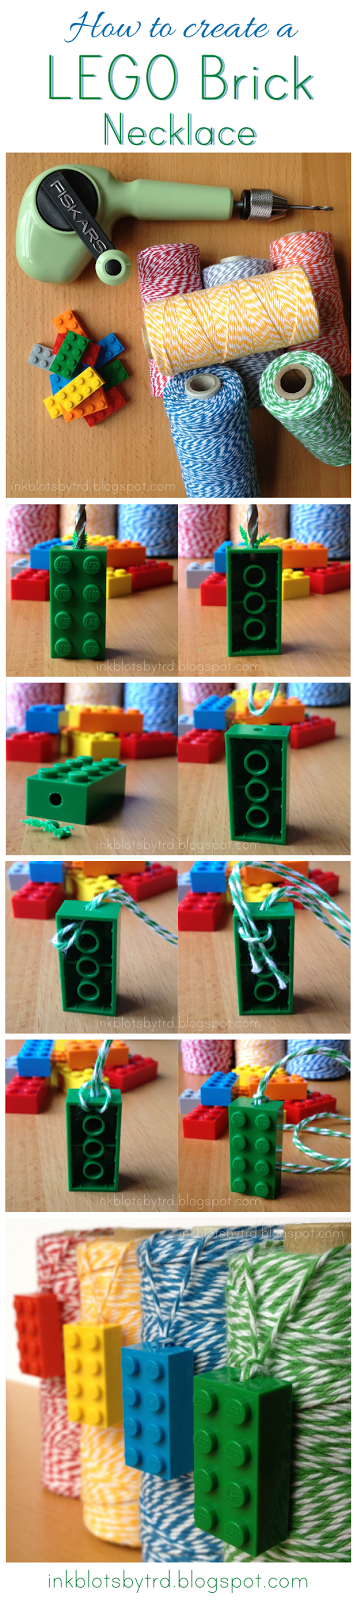
I was able to attend a few Fiskateer events and at one of them we created LEGO necklaces. One of my sons recently had a LEGO themed birthday party and LEGO brick necklaces were the perfect addition to the goodie bags.

With a Fiskars craft drill, these necklaces take less than a minute each to create:
Simply drill through one side of the LEGO brick, thread with twine, and you are done!

My Prize:
In addition to the sponsored prizes that are up for grabs, I've decided to host a little giveaway of my own! (Just add LEGO bricks and you can make LEGO necklaces, too!)
The winner will receive:
- a Fiskars craft drill
- a spool of Mandarin twine
- a spool of Peapod twine

To enter:
  • Leave a comment on this blog post. That's it!
If you would like additional chances to win you can do so in one (or all) of the following ways:
  • Follow this blog. {Please let me know you are a follower by leaving an additional comment.} 
  • "Like" InkBlotsbyTRD on Facebook. {Please let me know you are a follower by leaving an additional comment.}
  • Share about this giveaway on your own blog, Facebook, Pinterest, Google+, Twitter, or anywhere else. {Please let me know where you've shared by leaving one additional comment.}
Blog comments for my giveaway will close Sunday, March 29th @ 11:59pm (Pacific) and the winner will be announced Tuesday, March 31st here on my blog.
Please remember to check back here to see if you've won.
{The winner will have 72 hours to contact me with their information.}
{Due to shipping costs, my giveaways are available to US mailing addresses only.}

Sponsored Prizes:
You can find details about the sponsored prizes (and how to win them!) on the Fiskafriends blog.

{Note: Only one comment per person on this post will be counted for the sponsor prize. The additional comments will count only for my personal giveaway.}


Thanks for stopping by today!

The Next Stop:

Supplies: 
Twine: The Twinery;
Tools: Fiskars (Craft Drill, Scissors);

Other: LEGO (Bricks);

Friday, February 7, 2014

Polar Vortex? Have fun with it!

Are you one of the many families out there currently complaining about yet another day stuck at home during this polar vortex? As a homeschooling family, we are used to being at home during the day, but we decided to have some fun with the freezing temperatures...
I came across the idea of frozen bubbles, and thought we would give it a shot. I mixed up some dish soap and water and luckily we had a bubble wand sitting around to give it a try. The results were really neat, but I have to admit it was not easy to blow the bubble and then find it again when it was a bit windy...so I got another idea. 

I mixed some dish soap and water in a glass jar (it's just prettier that way) and used a straw to blow bubbles. I let the bubbles pile up and flow out and around the jar, and it was really interesting to watch the freezing process.
Go on...give it a try!

Tuesday, April 12, 2011

Release Day!

***Don't forget to check my etsy shop for an AMAZING deal on Stickles {hint: $1.25 per bottle!} and a huge stash of ribbon!***
>>Click here to go to my etsy shop<<

Today is the official release date for the May/June 2011 issue of Paper Crafts magazine.


I've had it in my hands for about a week now and it is a FABULOUS issue!

{I do have to say that my favorite projects are on pages 48, 51, and 76!}

I thought about giving you a peek at one of my cards from the issue, but instead I am going to show you something MUCH cuter - my daughter's version of one of my cards!
{She's 7 and can draw better than this, but you have to see my original card on page 51 to see why she did this.}


She took it one step further than I did...how cute is this?


You can get a little peek at the card that inspired Lacie in this post on the Paper Crafts Connection blog. {It's the one right beneath the light switch in the group photo at the end of the post.}

You can find the pattern for my "Apron Gift Card Holder" {page 48} here.

Thanks for stopping by today...have a fabulous day!

***Edited to add: I just noticed the "followers" count is currently at 199! Will you be the one to put it in the 200's? Please do! I think I feel a giveaway comin' on!

Tuesday, February 1, 2011

Valentine Window Display

I have a love-ly window display idea for Valentine's Day that I'd like to share with you today.

I remember making snowflakes like these when I was in grade school. My kids and I made them to hang in our front window in December.


{We hung them with The Twinery's Maraschino and Peapod twine.}

We enjoyed looking at them every day and our window felt empty when we took them down. Since Valentine's Day is coming up I thought I would try to take the same idea and do a heart display in our front window.


I made the hearts from basic red and pink construction paper and hung them with The Twinery's Maraschino and Pink Sorbet twine.


{The new Blossom twine would be an excellent choice for hanging, too!}


I'd like to keep creating hanging window displays throughout the year and so I put these screws up inside our windowframe so I can easily thread the twine and hang our seasonal display.


Let me know if you create a window display using your twine from The Twinery...I'd love to see!


Happy Valentine's Day!

Monday, September 13, 2010

Because sometimes...


you just have to color ON the kitchen table.

Sunday, December 21, 2008

Kid crafting

The kids made some masks out of paper plates (just a random day I was trying to give them something fun to do):

Monday, October 27, 2008

Pumpkin Fun

We went to my brother-in-law and NEW sister-in-law's house today to have some pumpkin fun with them and the kids. They carved a pumpkin while the kids painted and put stickers on another one. Here are some pictures from the day...