Saturday, July 26, 2008
Dad's Birthday - Double Pocket Card
Today is my Dad's birthday...Happy Birthday, Dad! He is a wonderful man and also one of my biggest crafting supporters. He bought me my Cricut and almost every cartridge I own. I guess I could gush about him here, but I won't...I'll just say I love him.
Ever since I saw the inspiration ad from BBTB, I had been thinking about how the background of that ad was divided into three parts...the sky, the grass, and the fence. I knew I wanted to do something with that idea, but wasn't sure exactly what...then I remembered the double pocket cards that I had seen people make on the Cricut message board. I thought this went along well with the idea of the three pieces of background and then with the woman standing in the front I liked the idea of having the tags in the pockets kind of breaking up the background. So anyway, there was my inspiration.
It is not easy to make a manly card. I wanted to do something different for the tags but nothing girly. Then I remembered that I had this Street Sign cartridge (courtesy of the wonderful Hallmark Scrapbook) that I have been wanting to use, but didn't know what for...and saw one of the road signs that I thought would make a neat tag. Then I saw the arrows and decided to use those since I have never really done anything with arrows before, either.
Here is a picture of the front of the card:
I am loving the swirly clips and thought that was a good addition. I used the AMAZING Storybook cartridge for "DAD". The tags and arrows are from Street Sign.
Here is a view with the tags out of the pockets:
I used the Journals A la Mode set from Fancy Pants for the stamping on the tags...I thought these were fun flourishes, but they still looked man-ish. All the ink on the card is Tim Holtz Distress Ink in Tea Dye. I will have our kids write or draw on each of the tags something special for Grandpa.
The inside of the card:
Since he is 57 today, my husband had the great idea of using the roadsign on the inside of the card to represent that. I was just going to write "Happy Birthday", but his idea was better. The numbers are done with the Storybook cartridge and the sign and arrows are done with the Street Sign cartridge (again). The arrow at the bottom is where we will sign our names.
Thanks for looking!
Thursday, July 24, 2008
Family Recipe Book
Let me start off by saying there are lots of major events and goings on in my family this year. This Saturday, one of my cousins is getting married. In September, another of my cousins is getting married. Also in September, my cousin is having her first baby. In October, my husband's brother is getting married. And then of course next January is when our new baby is expected to arrive.
I wanted to find something to do for wedding gifts that would be special...but cheap. So, I decided to make a family recipe book.
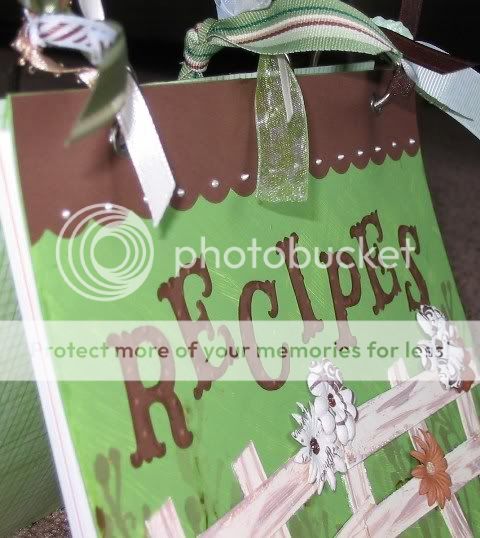
The design for the book was inspired by BBTB. I painted some plain chipboard sheets (cut a bit bigger than a half sheet) green and tried to give it a grassy effect. The part I was most inspired by on BBTB was the fence, so I wanted that to be a major part of my project. I cut some "fence" from chipboard and painted the pieces and antique white with some brown streaking for a weathered look. I was also loving the colors shown in the example on BBTB so I used green, brown, and shades of white as my palette.
I stamped the cover with different shades of brown ink using an Autumn Leaves clear stamp. and then attached the fence and some fun Primas. The centers of the Primas are done with Stickles or Liquid Pearls. There is a bit more Stickling on the fence and some Liquid Pearls along the top scallop on the front cover. The lettering is done with the new Cricut cartridge, Storybook! I am blessed enough to have some wonderful friends who bought this for me from the wonderful Hallmark Scrapbook as an early birthday present! (THANKS!) I used Distress Ink to make the letters stand out a bit more and Cuttlebugged them with the Swiss Dots embossing folder. I covered the inside of the front and back covers with some DCWV paper.
I used a fun border cut from the Storybook cartridge and topped it off with some Stickles for a fun accent on the back cover.
Okay, inside...
I did two title pages - one for "Main Dishes" and one for "Extras" (side dishes, desserts, etc.) I scanned in some of the recipes written by my Grandma and used that as a subtle background. I then used Distress Ink around the edges and added some beautiful corner cuts from, once again, Storybook. I love this cartridge! I added some Stickles on the corner cuts, but those don't show up too well in the picture.
I e-mailed and called folks in my family and asked them to give me some of their favorite recipes and formatted and printed those off on cardstock. I made each recipe page a half of an 8 1/2 x 11 sheet. I used my Crop-A-Dile to punch the holes for the rings.
I topped the whole project off with some eyelets courtesy of the Crop-A-Dile and some rings courtesy of a sweet RAK-er from the Cricut MB. I then went through my ribbon box with my daughter and we picked out some fun ribbons to "tie" the project all together.
I was very excited to have this project done just an hour or so before I needed to get it in the hands of the one who will be toting it to the wedding for me :o) Thanks for looking!
Subscribe to:
Posts (Atom)