Showing posts with label Layouts. Show all posts

Friday, May 16, 2014

XOXO Layout


<<<Looking for my Lupus Awareness Month giveaway?>>>
<<<You can find it here.>>>


I love these pictures that my favorite photographer took of my kids a couple years ago at a fun Valentine's Day photo shoot.
(Yes...I said a couple years ago. I am not generally a scrapbooker, so even that is ahead of the game for me.)

When I came across this patterned paper from Crate Paper's Love Notes collection, I thought it would be perfect to pair with these love-themed photos. I added overlays (again from the Love Notes collection) on top of each picture on the page. The printing on the overlays helped the bright photos blend better with the aged look of the paper.
I finished off the page with a few transparencies and chipboard pieces from the same collection and then added in some simple pearls. 
Thanks for stopping by!
Supplies:
Patterned Paper: Crate Paper (Love Notes - 12x12);
Chipboard: Crate Paper (Love Notes);
Transparencies: Crate Paper (Love Notes - Valentines);
Pearls: Melissa Frances (Pearls - GN297);
Tools: Fiskars (Trimmer); Tim Holtz (Tiny Attacher);

Friday, May 9, 2014

Hello/Goodbye Layout

<<<Looking for my Lupus Awareness Month giveaway?>>>
<<<You can find it here.>>>

Today I've got a layout to share with you.
The majority of this layout was created using paper and ephemera from the Styleboard collection (by Maggie Holmes for Crate Paper). I love the look and the colors in this collection - a great mix of vintage and fresh.
I used two pictures here - one was from when my dad arrived for a visit, and the other from the airport as he was headed home. Generally I wouldn't be scrapping two pictures together on a page that were so far apart time-wise, but I just thought these told a story when they were put together. I love the emotion in these pictures, and wanted to represent the "memory" feel in my layout with all the scattered ephemera pieces.

Thanks for stopping by today!
Supplies:
Patterned Paper: Crate Paper (Maggie Holmes - Styleboard);
Ephemera: Crate Paper (Maggie Holmes - Styleboard);
Other: Celebrate It (Paper Bag);
Stickers: Stickopotamus (Nostalgiques - Black Typewriter ABC); American Crafts (Thickers - Cream Soda #42715);
Tools: Fiskars (Trimmer, Scissors); 

Tuesday, January 21, 2014

Easter 2013 {Pocket Page Scrapbooking}


Today I wanted to share a page from my newest venture in paper crafting: pocket page scrapbooking.

I've been eyeing the Project Life/pocket scrapbooking style for quite awhile and loved the size and configuration of the Simple Stories SN@P pages, so I decided to give it a whirl. I love how it is such an easy mix between a photo album and a scrapbook page. It is so much quicker to create a layout, but still has a beautiful look.
For this page, I used some papers from My Mind's Eye and created my title easily with some Lily Bee Design stickers. I added that cute little wood veneer bird from Studio Calico to give it a little something extra. 

I am excited to continue documenting our family memories this way. 

Thanks for stopping by!

Supplies:
Patterned Paper: My Mind's Eye (Cut & Paste: Adorbs - 6x6);
Stickers: Lily Bee Design (Handmade: ABC Stickers); 

Other: Studio Calico (Wood Veneer Shape - Bird);
Pocket Page Protector: Simple Stories;
Tools: Fiskars (Trimmer, Scissors); Scor-Pal (Scoring Board);

Friday, January 17, 2014

Starbucks with Mommy


Well...this is something you haven't seen from me in a while, but I am excited to have a layout to share today:
This sweet photo was from a night out that I had with my youngest son - we went to Starbucks and got drinks and talked. (He got hot chocolate, I got coffee.) I love these sweet times that I get to share with my kids and knew I wanted to document it.

I am not a big fan of pictures of myself, but I knew since it was part of out night out, I wanted to include it in the layout somehow. A hidden pocket behind the main photo was a great way to accomplish it.
Here's what it looks like when you pull the extra photo out:
I really love how this layout turned out and I am excited to be documenting our memories again. 

Thanks for dropping by today!

Supplies:
Patterned Paper: Lily Bee Design (Lovely: Charm; Memorandum: Office Blue; Happily Lost - 6x6);
Embellishments: Studio Calico (Die Cuts); Maya Road (Bingo Circle);

Trim: Heidi Swapp (Color Magic: Scallop Ribbon);
Tools: Fiskars (Trimmer, Scissors); 

Saturday, February 4, 2012

February Sketch Challenge {Authentique Paper}

{As seen today on the Authentique Paper blog}


Authentique Paper is back with another sketch challenge!
Generally I play along with the card sketch, but this time I am changing it up a bit and using the layout sketch:


For my layout I combined a 12x12 paper from the new Genuine line and added in a pop of orange from the Free Bird collection (Endless).


I love that the neutral denim/blue color scheme of the Genuine collection allows for adding in any pop of color and will allow the collection to be truly versatile.

Because I am not a scrapper, my only goal was to get a picture on the page to document a little trip my husband and I took to Tahoe.

I added in a seam binding bow and a stick pin to add a little embellishment, but I feel like these papers could have stood on their own.


Be sure to head on over to the Authentique Paper blog to see the coordinating card sketch - and get yourself in on the challenge!

And, if you didn't make it to CHA - check out this quick tour of the Authentique Paper booth...you will get a peek at the four newest lines: Celebrate, Genuine, Loyal, and Delightful.


Supplies:
Patterned Paper: Authentique Paper (Genuine - Perfection); Authentique Paper (Free Bird - Endless);
Ink: Ranger (Distress Stain - Wild Honey);
Embellishments: Maya Road (Mini Tickets - Transparency); Jillibean Soup (Pin - Blue/Orange);
Other: HugSnug (Seam Binding - Chalk White);
Tools: Tim Holtz (Tiny Attacher); Fiskars (Trimmer, Scissors);


Wednesday, April 27, 2011

Photo finish!

I've got a commissioned layout that is SO close to being done...I just need to get the picture in there.

Anyway, here it is, ready for that picture:


{The picture is of a precious little baby girl peeking her head out of some blankets}


I haven't quite decided if I want to cut the picture in a circle to flow with the rest of the page or leave it as a rectangle to set it apart.

Decisions, decisions...

{PS - Don't forget to enter my giveaway!}

Supplies:
Cardstock: Core'dinations
Patterned Paper: K & Company {Berry Sweet}
Embellishments: K & Company {Berry Sweet}; Prima {Pearls}
Tools: Fiskars {Round N Round Squeeze Punches - M, L, XL}

Monday, January 3, 2011

Loves & Kisses


After completing my Eiffel Tower project I couldn't stop dreaming of pink & black projects using the Echo Park "Be Mine" collection and the matching Unity stamps. I thought this picture {taken by Alisha from Alisha Hurt Photography} was the perfect picture to use with these papers and stamps.

I used Black Tuxedo ink from Memento to stamp the images and used an embossing stylus to add some dimension. I layered in some tulle, Prima flowers, Tim Holtz film strip "ribbon" and Maya Road trinket pins and chandelier beads.

Supplies:
Patterned paper: Echo Park Paper Company {Be Mine};
Stamps: Unity Stamp Company {I Adore You}; Unity Stamp Company {With Love};
Ink: Memento {Tuxedo Black};
Embellishments: Maya Road {Trinket Pins}; Maya Road {Chandelier Beads}; Tim Holtz {Film Strip Ribbon}; Prima Marketing {Flowers}; tulle;
Tools: Fiskars {Craft Knife}; Fiskars {Paper Trimmer}; Fiskars {Scissors}; Martha Stewart {Scoring Board}; Loew-Cornell {Embossing Stylus};

Friday, August 27, 2010

3 Layouts in 3 Weeks

I recently went through a sort of dry-spell in my crafting.
Things got busy and I didn't make time for it.

Things are still busy, but I demanded (to myself) that I make time for crafting. I've been working on a commissioned scrapbook and I had three layouts that were sort of half finished for quite awhile. I committed myself to finishing the 3 layouts within 3 weeks. I finished the first layout (and posted it here) and now it is time to reveal the final two.

No, the book isn't done - but at least 3 layouts are now complete!


While I was shopping for papers for the book, I saw a die cut paper from Crate Paper called Tickled Pink, and I thought it would be great for the page about this adorable little girl's birth. I was so inspired by the paper that I decided to use the name of the paper for the title of the page as well.


I used my sewing machine to stitch a border around the focus photo and also some accents on the side pages. It is hard to see in the picture, but I think it give the layout a nice finishing touch.


When I was gathering the pictures for the book, Lori (who asked me to scrapbook some pictures from her daughter's baby/toddler times) told me a little bit about each picture or set of pictures so that I could have a background to keep in mind while designing the pages.


Although this Maui page is a very happy one, the story that goes along with it is not quite so happy. Lori ended up sick much of the time that the family was vacationing in Maui and was so sick that she barely got out. I do think these are some great pictures despite Lori feeling so ill.


Sometimes scrapbooks are so wonderful because we can scrap the true emotion of the event...but sometimes scrapping the event a little happier than it might have been can bring out the good memories and leave the not-so-fun moments behind.


Supplies - Tickled Pink Layout:

Papers: Crate Paper
Cardstock: Bazzill, Bazzill Bling
Embellishments: Prima (Flowers), American Crafts (Thickers), Brads (from stash), Machine Stitching
Tools: Paper Trimmer


Supplies - Maui Layout:

Papers: Crate Paper
Cardstock: Bazzill Bling, Bazzill Washboard
Embellishments: Jenni Bowlin (Bliss Bingo Card), Prima (Flowers), Maya Road (Chipboard Letters), Tags (from LSS), Crate Paper (Brads), American Crafts (Photo Turn), Machine Stitching, Twill (from LSS)
Tools: Paper Trimmer, Fiskars Fingertip Craft Knife, Mod Podge, Foam Brush

Tuesday, August 17, 2010

aROUND Robin


There was recently an online crop on the Fiskateer message boards. I was excited to be part of a challenge called "aROUND Robin". The task was to create a round layout in two hours, but the real challenge to it was that each member in the challenge would be "scraplifting" another member's layout - similar to a game of telephone.

I was sent this layout (created by Robin) as my inspiration.


I used the general idea of the layout and rolled it on to it's side and created my layout from that.


My layout was then sent on to the next person in line who created their layout using mine as inspiration (they never saw Robin's original layout). And then the layouts would be passed along in the same way until the last person completed their layout.

This was such a fun challenge!

Monday, August 16, 2010

Sisters

I'm finally getting back to the album that I am making for a friend.

Although the rest of the book will be created with brighter colors, I thought there was a brightness to these "pastel" colors that will work well in the flow of the book.


Supplies:
Cardstock: Bazzill
Lettering: American Crafts Thickers
Embellishments: Machine sitiching, Prima Flowers, Prima flower centers (Sultan Collection), brads
Tools: Fiskars scissors, paper trimmer

Wednesday, July 28, 2010

It's been awhile...


It's been awhile...a long while.
Like almost 6 whole months I've gone without a blog post.
I am a bad blogger.

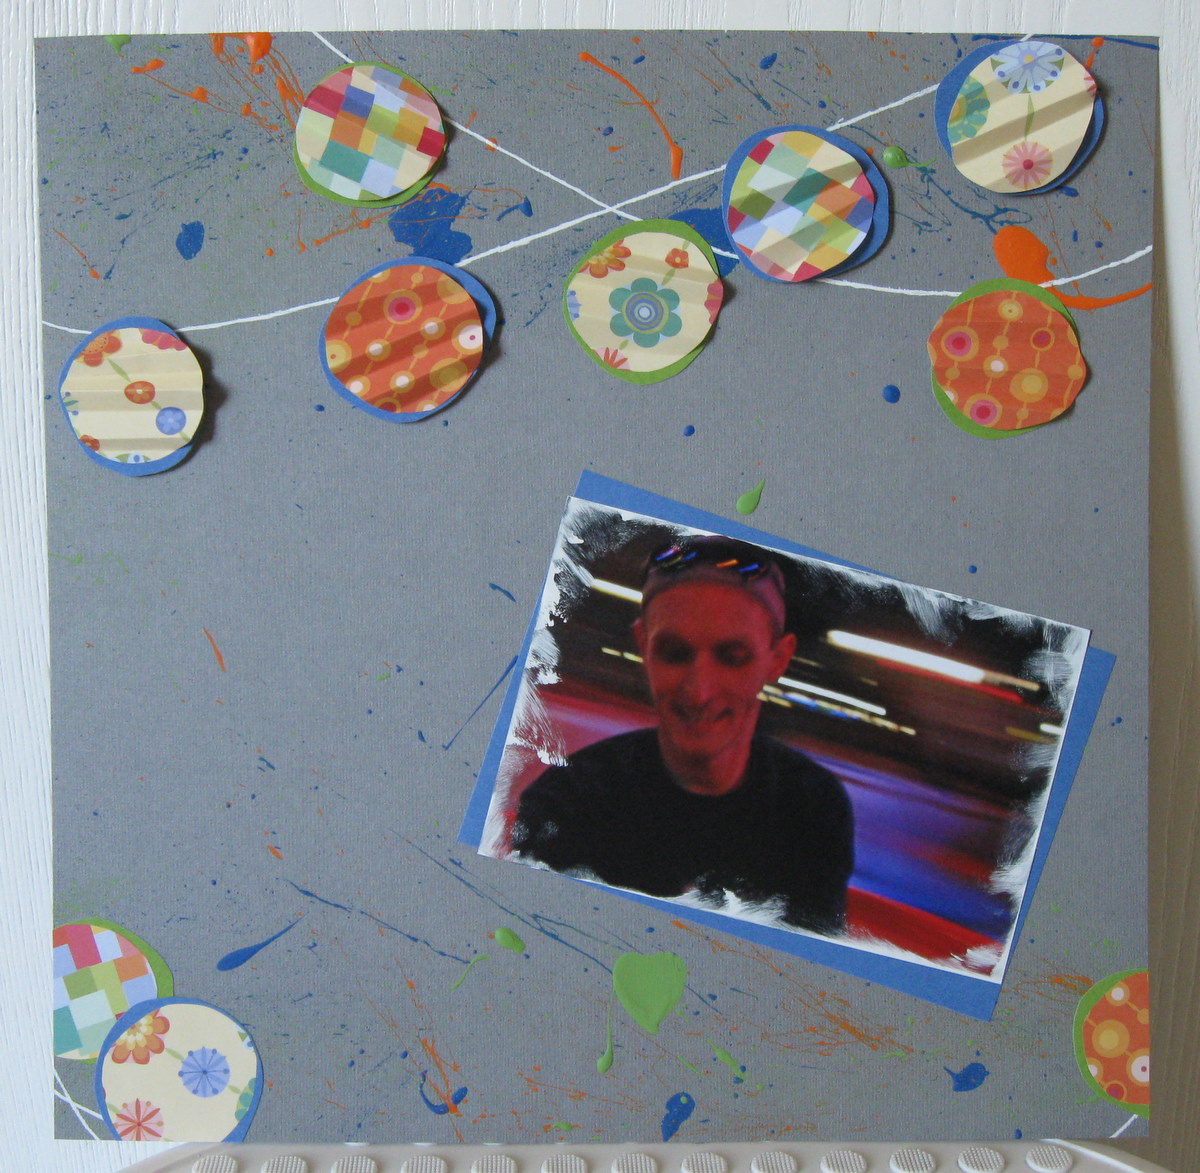
But, the good news is that I have a fun layout to share. I saw this Tuesday Trigger on the Moxie Fab World blog and it reminded me of the teacups (now know as the Mad Tea Party) at Disneyland.


These are the lanterns that hang above the Mad Tea Party:


My husband and I recently took a trip (for a week...and we left our three little kids at home!) and I a picture that I liked of Caleb madly spinning us. It is not a good quality picture (we were spinning fast and it was taken at night), but I like the feeling it gives - to me it really feels like you are right there in the teacup and getting a bit dizzy. On the layout I tried to incorporate the lantern idea and then threw in the paint splatters to try to give it that dizzy, teacup feeling.


Supplies:
Paper: DCVW and American Traditional Designs
Embellishments: Paint, UniBall white pen, Pop Dots
Tools: Fiskars Scissors

Monday, January 11, 2010

More custom work...


Supplies:
Cardstock: Bazzill, American Crafts
Chipboard: Maya Road
Ribbon: American Crafts
Tools: Fiskars Scissors, white paint, paintbrush


Supplies:
Cardstock: Bazzill, Little Yellow Bicycle
Chipboard: Little Yellow Bicycle
Brads: Little Yellow Bicycle
Tools: Fiskars Craft Knife


Supplies:
Cardstock: Crate Paper
Chipboard: Crate Paper
Brads: Crate Paper
Lettering: American Crafts Thickers
Tools: Making Memories Trimmer


Supplies:
Cardstock: Coredinations
Paper: Reminisce
Cardstock Stickers: Reminisce
Tools: Fiskars Scissors, Coluzzle, White Ranger Inkssentials Pen

Thursday, December 10, 2009

A new project...

I've started on a new project...a scrapbook for a friend. Right now I am working on pages for about the first year and a half of her daughter's life.

I am so excited to be doing this! {And, for some reason the creative juices seem to flow better when I am not scrapbooking my own family.}

These pages are a bit more "frilly" than I intend the rest of the album to be, but it's an adorable little girl and sometimes girls need a bit of frill {but don't tell my daughter I said that!}.

The album I am working with allows 12 x 12 or 6 x 12 pages. I had never done a 6 x 12 page before, but I am really liking them!


{As always, click on the pictures if you would like to enlarge them a bit.}

Monday, November 30, 2009

More Pink Paislee

I was having so much fun playing with my Pink Paislee papers that I whipped up two more projects...another layout and a small notebook. Both use the Office Lingo Collection papers.

Here they are:


{The overlay on the notebook is from Hambly.}

Don't forget to visit A Walk Down Memory Lane!

READ All About It


It's not too late to get some great Pink Paislee goodies 15% off at A Walk Down Memory Lane, but November is quickly coming to an end...so you'd better hurry up!


I created this layout about my daughter learning to read using the Pink Paislee Pop Fashion Parachute Pants 12 x 12 paper as the base and matted my focal picture on DCVW cardstock. I added some Maya Road pins, a sprinkling of brads, a few {digital} library cards created by Shimelle {I changed the color of the original cards and added the text with GIMP}, and voila!

Monday, November 9, 2009

Pink Paislee at A Walk Down Memory Lane

This month I am a Guest Designer for A Walk Down Memory Lane {AWDML} and the featured manufacturer for November is Pink Paislee! And featured manufacturer means 15% off...all month long!

Today I am going to share with you a layout about each of my three children using Pink Paislee papers.

True Beauty:


This layout features a few papers from Pink Paislee {and I got them at AWDML, of course}.

True Beauty Supplies:
- Pink Paislee Sweet Cakes - Lovey Dovey
- Pink Paislee Enchanting - Wonderful
- Pink Paislee Enchanting - Pleasant
- American Crafts Thickers
- Tim Holtz Distress Ink
- Chandalier stamp by Tim Holtz for Stampers Anonymous
- Making Memories Glitter Clears #30164
- Title piece created using GIMP


Big Shoes:


I love this background grid paper from Pink Paislee...the detail in the distressing of this paper is fantastic. It even has some light textile type designs on it faintly along the edges. It makes it easy to create a nice looking layout when the papers are so beautiful to start!

Big Shoes Supplies:
- Pink Paislee Office Lingo - Cubicle
- Basic Grey Mellow 6x6 Pad
- American Crafts Thickers
- Tim Holtz Distress Ink
- Tim Holtz Tiny Attacher
- Sharpie Fine Tip Marker {Black}


Oh, Baby:


This background paper from Pink Paislee is fabulous! I added the stamping behind the photo just because I felt like I was cheating with such an easy layout...the paper had so much character by itself that it really didn't need anything!

Oh, Baby Supplies:
- Pink Paislee Captivating - Tender
- DCWV Cardstock
- American Crafts Thickers
- Tim Holtz Distress Ink
- Accent stamp by Tim Holtz for Stampers Anonymous
- Sharpie Pen. {Blue}


Stay tuned this month for more fun from AWDML and Pink Paislee!

Tuesday, October 6, 2009

Crazy Pair

This is my debut project as the October Guest Designer for Creative Cuts & More! I am so excited to work with their products this month. Be sure to get ready for a great blog hop on Friday, October 16th. Come back here to see what I've created and also be sure to visit the Creative Cuts & More designer's blogs {I'll have links for you then} to see what they've come up with!


Get it? Pear...pair...very punny, right?

For now, let's talk about today's project, shall we?

I really wanted to create a layout with shaped paper, but it is harder than it looks! I just added the kraft cardstock behind the great scalloped circle cut from Creative Cuts & More and felt comfortable again. I paired {ah, get it..."pair"ed?} the cute pear cuts with a chipboard frame. I generally cover my chipboard with paper, but this time I thought it looked nice plain. I added in the pictures of two of my crazy kids, a 6x6 sheet of Basic Grey Archaic paper, and then created the title spot using a basic shape from a free digital scrapbooking journal stamp and created the grid and title with GIMP {the font is CK Newsclips}.


The great cuts from Creative Cuts & More really helped the project come together quickly! The supplies I used are listed below if you'd like to scraplift my layout {and if you'd like to use my title spot just click on the image below for the full version}.


Creative Cuts & More Supply List:
1 x Circle - Scallop Mini 11 1/2": Textured Bazzill - Chiffon
1 x Antique Elegance Frame: Chipboard - Medium Weight
2 x Pear - Mini - Family Preserves: Textured Bazzill - Pear
2 x Pear - Mini - Family Preserves: Textured Bazzill - Parakeet

Other Supplies:
Basic Grey paper, kraft cardstock, Fiskars scissors
, GIMP