
I am selling some of my Cricut cartridges on eBay...most of them are retired and hard to find.
You can even make me an offer {via eBay}!
{Click the name of each cartridge and it will take you to the individual auction for that cartridge.}
All Mixed Up *SOLD*
Animal Kingdom
Beyond Birthdays
Celebrations *SOLD*
Doodlecharms *SOLD*
George & Basic Shapes
Mini Monograms
New Arrival *SOLD*
Paper Pups *SOLD*
Snow Friends 2009-2010 *SOLD*
Stamped
ZooBalloo *SOLD*
Seller name: CakeJunkie <-- Click to see all my current listings
I also have some new bottles of Stickles for sale - you can find them on etsy here:
{http://www.etsy.com/listing/70470161/stickles-glitter-glue-lot-of-23-original}
23 bottles for $34.50! That's only $1.50 per bottle!
Showing posts with label Cricut. Show all posts
Showing posts with label Cricut. Show all posts
Tuesday, March 22, 2011
Tuesday, February 8, 2011
Bubbles Cards
Don't these circles remind you of bubbles?
It's fun to see what you can do with some simple punched shapes to create a quick card.

Supplies:

Cardstock: Bazzill {Intense Pink, Lily White, Nixon, Parakeet}
Stamp {Clear}: Heidi Grace Designs {I love you from Greetings set}
Ink {Chalk}: Tsukineko {Tea Leaves}
Embellishment {Jewel}: Prima Marketing {pink jewel from e. line pearls/crystals #300524}
Tools: Fiskars {Round N Round Squeeze Punch - M, L, XL}, paper trimmer, needle, thread, sewing machine

Supplies:
Cardstock: Bazzill {Intense Pink, Lily White, Nixon, Parakeet}
Die cuts: Cricut {"You" from Just Because Cards cartridge; "thank" from Street Signs cartridge}
Tools: Fiskars {Round N Round Squeeze Punch - M, L, XL}, paper trimmer, needle, thread, sewing machine
You can find the supplies you will need to make these cards in the A Walk Down Memory Lane store!
Friday, July 10, 2009
ProvoCraft / Cricut : Gypsy

Hmmm...what's this???
Gypsy from Provo Craft

How long until it's released? See here.
Information from Obsessed with Scrapbooking:
Features:
•Size – 8” x 3” x 1.5”
•Weight – 11 ounces
•Screen Size - 4.7”, 16:9, 480 x 272
•Stylus Length – 3.75”
•Storage – ~4000 Cartridges, 10000+ Designs
•Battery Life – 4 hrs cont. 18 hrs int.
•Compatible with all Cricut Machines and Cartridges
•Weld, size, slant, rotate, stretch, preview
•2 Full content cartridges preloaded
Benefits:
•No computer required
•All CDS (Cricut Design Studio) functionality on-the-go with no PC
•Interfaces with CDS when connected to a PC
•Stores All Content
•Stores All Overlays
•Stores All Manuals
•Stores CDS Projects
Friday, May 1, 2009
Peggy Loves Vintage - Elephant

(Click on the images to view them larger)
This card was done for the BBTB contest sponsored by Peggy Loves Vintage.
This is the original elephant image from Peggy Loves Vintage:

I'm not very much of a red person, so I changed it to make it a bit orange-y. I printed the image multiple times and pop dotted some sections of the image to give it a bit more depth. I added a few extra touches with some Distress Stickles and Distress Ink.
The card itself is made from a cut on the Storybook Cricut cartridge. I cut it once in white cardstock and once in black. Then I made the white cardstock look more vintage using the Tim Holtz Distress Inks. The polka dot ribbon is from Miss Elizabeth's (Dollar Tree!) and was originally white and I used the Distress Inks on there as well. I finished it off with a few extra touches with my ZIG pen.

(There are two posts today for this contest...so scroll down...)
Wednesday, February 11, 2009
Engagement
Here's a layout in progress (it will be two pages - with the story of how we got engaged on the other page) of the night Caleb and I got engaged:

The patterned paper I aquired through a paper exchange...and totally love it! I believe it is made by 7Gypsies. The solid colored papers were from the Target dollar spot. I used the Home Accents Cricut cartridge for the "LOVE", birds, and branches - all cut from DCWV cardstock and inked with Tim Holtz Distress Inks. And of course it wouldn't be complete without some Stickles!

The patterned paper I aquired through a paper exchange...and totally love it! I believe it is made by 7Gypsies. The solid colored papers were from the Target dollar spot. I used the Home Accents Cricut cartridge for the "LOVE", birds, and branches - all cut from DCWV cardstock and inked with Tim Holtz Distress Inks. And of course it wouldn't be complete without some Stickles!
Tuesday, January 27, 2009
Local activity
Here are some layout of some local activities we have done.
Fairytale Town:

I can't recall where the patterned paper is from (oops!) and the solid paper is from DCWV. The title was done with the Alphalicious Cricut cartridge. Of course I have got some Primas on there and some miscellaneous brads.
Fairytale Town is a cool place in Sacramento that is basically a park for kids with toys that are done in storybook/fairytale themes. There is a slide made to look like a big shoe ("There was an old woman who lived in a shoe..."), a "crooked mile" walkway, a pirate ship, a castle, a teepee, and so many other things to explore. Oh, and I can't forget the infamous piece of swiss cheese! There are even a few animals. It has been around forever and definitely needs some new paint on a few of the pieces, but the kids love it.
Train Museum:

The patterned paper is from a paper swap and the cardstock is just from those packs of untextured cardstock that you can pick up in JoAnn's or Michaels. I used the Storybook Cricut cartridge for the titile on this one and inked the title and the cardstock with Tim Holtz Distress Inks. The buttons are from a cheap package I picked up in the sewing department of WalMart.
The train museum in Sacramento is so fun. There are all sorts of trains to see...some you can even walk through. I love the dining car that has displays of different dish sets that were used on different railways (and are much more fancy than any dishes I own!) and the mail car that shows how they sorted and delivered the mail on a moving train. The second floor of the museum has pictures of trains and also a big selection of different toy trains...even Thomas! Definitely cool for the whole family.
Monday, January 26, 2009
Lacie & Javan layouts
Here are a couple of layouts I have done about Lacie & Javan. they have their days, but overall they get along really well and have fun and lots of good times together.
A Kiss From Big Sis:
 I used the Alphalicious Cricut cartridge on this one.
L&J:
 I used the Street Signs Cricut cartridge on this one.
It was a totally new concept to me to have such a plain white background, but I saw something in the Creating Keepsakes magazine that made me want to try it and so I did. I still need to add a bit to it, but I think it turned out okay. I have also been inspired by the layouts Becky Higgins does in the CK magazine...all very basic square patterns - so simple, but very visually appealing at the same time. I tried to make my own sketch using her basic ideas. If you haven't done a layout using either of these techniques, try it!
Thursday, January 22, 2009
More layouts...
Here are a couple of layouts I did of somewhat recent vacations/trips. Caleb & I went to Las Vegas (he had to go for a work conference and I went along for the free hotel room and some time off). Then Lacie & I went to Seattle (with my dad and brother) when she was a flower girl in my cousin's wedding. Here are the layouts I have done about those trips (so far...I have another to do still of the Seattle trip). I still need to add some Stickles and a few embellishments maybe, but overall they are pretty much done.
Las Vegas:
 I used the Street Signs Cricut cartridge on this one.
Seattle:
 I used the All Mixed Up Cricut cartridge on this one.
Las Vegas:
 I used the Street Signs Cricut cartridge on this one.
Seattle:
 I used the All Mixed Up Cricut cartridge on this one.
Wednesday, January 21, 2009
Back to crafting...
This blog has recently gone to all things baby and family, but now that I have a new camera (yay!) I can post some pictures of some layouts I have done. It is time to get this blog back to crafting!
I did these layouts of Lacie and Javan at the last Cricut swarm. Since I don't scrapbook much, I wanted to just get a bunch of pictures about them on a page - so here's what I came up with:
Lacie:
 I used the Storybook Cricut cartridge on this one.
Javan:
 I used the Street Signs Cricut cartridge on this one.
Also, if you like Queen & Co., they have just announced some new goodies for the year...check it out on their blog:
http://www.queenandcompany.typepad.com/
Saturday, July 26, 2008
Dad's Birthday - Double Pocket Card

Today is my Dad's birthday...Happy Birthday, Dad! He is a wonderful man and also one of my biggest crafting supporters. He bought me my Cricut and almost every cartridge I own. I guess I could gush about him here, but I won't...I'll just say I love him.
Ever since I saw the inspiration ad from BBTB, I had been thinking about how the background of that ad was divided into three parts...the sky, the grass, and the fence. I knew I wanted to do something with that idea, but wasn't sure exactly what...then I remembered the double pocket cards that I had seen people make on the Cricut message board. I thought this went along well with the idea of the three pieces of background and then with the woman standing in the front I liked the idea of having the tags in the pockets kind of breaking up the background. So anyway, there was my inspiration.
It is not easy to make a manly card. I wanted to do something different for the tags but nothing girly. Then I remembered that I had this Street Sign cartridge (courtesy of the wonderful Hallmark Scrapbook) that I have been wanting to use, but didn't know what for...and saw one of the road signs that I thought would make a neat tag. Then I saw the arrows and decided to use those since I have never really done anything with arrows before, either.
Here is a picture of the front of the card:

I am loving the swirly clips and thought that was a good addition. I used the AMAZING Storybook cartridge for "DAD". The tags and arrows are from Street Sign.
Here is a view with the tags out of the pockets:

I used the Journals A la Mode set from Fancy Pants for the stamping on the tags...I thought these were fun flourishes, but they still looked man-ish. All the ink on the card is Tim Holtz Distress Ink in Tea Dye. I will have our kids write or draw on each of the tags something special for Grandpa.
The inside of the card:

Since he is 57 today, my husband had the great idea of using the roadsign on the inside of the card to represent that. I was just going to write "Happy Birthday", but his idea was better. The numbers are done with the Storybook cartridge and the sign and arrows are done with the Street Sign cartridge (again). The arrow at the bottom is where we will sign our names.
Thanks for looking!
Thursday, July 24, 2008
Family Recipe Book
Let me start off by saying there are lots of major events and goings on in my family this year. This Saturday, one of my cousins is getting married. In September, another of my cousins is getting married. Also in September, my cousin is having her first baby. In October, my husband's brother is getting married. And then of course next January is when our new baby is expected to arrive.
I wanted to find something to do for wedding gifts that would be special...but cheap. So, I decided to make a family recipe book.
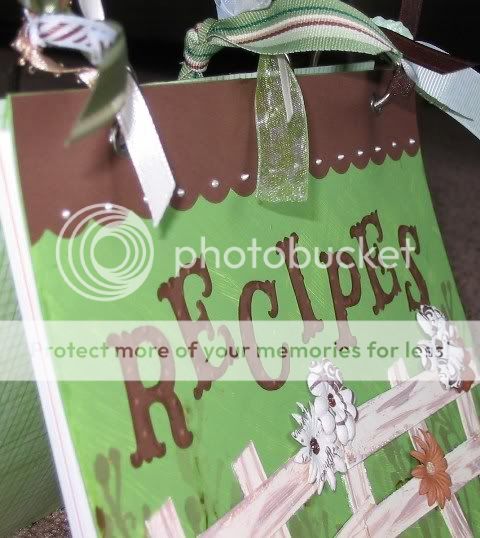
The design for the book was inspired by BBTB. I painted some plain chipboard sheets (cut a bit bigger than a half sheet) green and tried to give it a grassy effect. The part I was most inspired by on BBTB was the fence, so I wanted that to be a major part of my project. I cut some "fence" from chipboard and painted the pieces and antique white with some brown streaking for a weathered look. I was also loving the colors shown in the example on BBTB so I used green, brown, and shades of white as my palette.

I stamped the cover with different shades of brown ink using an Autumn Leaves clear stamp. and then attached the fence and some fun Primas. The centers of the Primas are done with Stickles or Liquid Pearls. There is a bit more Stickling on the fence and some Liquid Pearls along the top scallop on the front cover. The lettering is done with the new Cricut cartridge, Storybook! I am blessed enough to have some wonderful friends who bought this for me from the wonderful Hallmark Scrapbook as an early birthday present! (THANKS!) I used Distress Ink to make the letters stand out a bit more and Cuttlebugged them with the Swiss Dots embossing folder. I covered the inside of the front and back covers with some DCWV paper.

I used a fun border cut from the Storybook cartridge and topped it off with some Stickles for a fun accent on the back cover.
Okay, inside...

I did two title pages - one for "Main Dishes" and one for "Extras" (side dishes, desserts, etc.) I scanned in some of the recipes written by my Grandma and used that as a subtle background. I then used Distress Ink around the edges and added some beautiful corner cuts from, once again, Storybook. I love this cartridge! I added some Stickles on the corner cuts, but those don't show up too well in the picture.
I e-mailed and called folks in my family and asked them to give me some of their favorite recipes and formatted and printed those off on cardstock. I made each recipe page a half of an 8 1/2 x 11 sheet. I used my Crop-A-Dile to punch the holes for the rings.
I topped the whole project off with some eyelets courtesy of the Crop-A-Dile and some rings courtesy of a sweet RAK-er from the Cricut MB. I then went through my ribbon box with my daughter and we picked out some fun ribbons to "tie" the project all together.
I was very excited to have this project done just an hour or so before I needed to get it in the hands of the one who will be toting it to the wedding for me :o) Thanks for looking!
I wanted to find something to do for wedding gifts that would be special...but cheap. So, I decided to make a family recipe book.
The design for the book was inspired by BBTB. I painted some plain chipboard sheets (cut a bit bigger than a half sheet) green and tried to give it a grassy effect. The part I was most inspired by on BBTB was the fence, so I wanted that to be a major part of my project. I cut some "fence" from chipboard and painted the pieces and antique white with some brown streaking for a weathered look. I was also loving the colors shown in the example on BBTB so I used green, brown, and shades of white as my palette.
I stamped the cover with different shades of brown ink using an Autumn Leaves clear stamp. and then attached the fence and some fun Primas. The centers of the Primas are done with Stickles or Liquid Pearls. There is a bit more Stickling on the fence and some Liquid Pearls along the top scallop on the front cover. The lettering is done with the new Cricut cartridge, Storybook! I am blessed enough to have some wonderful friends who bought this for me from the wonderful Hallmark Scrapbook as an early birthday present! (THANKS!) I used Distress Ink to make the letters stand out a bit more and Cuttlebugged them with the Swiss Dots embossing folder. I covered the inside of the front and back covers with some DCWV paper.
I used a fun border cut from the Storybook cartridge and topped it off with some Stickles for a fun accent on the back cover.
Okay, inside...
I did two title pages - one for "Main Dishes" and one for "Extras" (side dishes, desserts, etc.) I scanned in some of the recipes written by my Grandma and used that as a subtle background. I then used Distress Ink around the edges and added some beautiful corner cuts from, once again, Storybook. I love this cartridge! I added some Stickles on the corner cuts, but those don't show up too well in the picture.
I e-mailed and called folks in my family and asked them to give me some of their favorite recipes and formatted and printed those off on cardstock. I made each recipe page a half of an 8 1/2 x 11 sheet. I used my Crop-A-Dile to punch the holes for the rings.
I topped the whole project off with some eyelets courtesy of the Crop-A-Dile and some rings courtesy of a sweet RAK-er from the Cricut MB. I then went through my ribbon box with my daughter and we picked out some fun ribbons to "tie" the project all together.
I was very excited to have this project done just an hour or so before I needed to get it in the hands of the one who will be toting it to the wedding for me :o) Thanks for looking!
Tuesday, May 20, 2008
Engagement/Wedding Cards
Here are some cards I made to congratulate my cousins (and their soon-to-be-wives) on their engagement and upcoming weddings:

I used the new Cricut Home Accents cartridge for all the cuts...love it!!!
I used the new Cricut Home Accents cartridge for all the cuts...love it!!!
Wednesday, April 2, 2008
Fall Fun
I made this layout for a challenge. I had to use at least 5 colors on the layout, Doodlebug glitter (it is on the lettering and scroll-y thing), the Cricut (used Alphalicious for the lettering), and the Cuttlebug (the scroll-y thing is cut out from the Swirls embossing folder). I also added some ribbons and buttons. Oh, and I used my Fastenater for the first time.
I really have not made layouts before. I have done the two page family tree spread and then a title page for the family album I hope to make. I had fun with this but it still looks like too much empty space or something. I didn't really know what to do. It was harder than I expected to make a layout. I had all these nice fall colors in my head that I wanted to use, but they all clashed so bad with the pictures...so I had to use bright colors for a fall layout. Kinda weird I thought, but I guess it works.
Anyway, here it is:

Give me hints on how to improve!
I really have not made layouts before. I have done the two page family tree spread and then a title page for the family album I hope to make. I had fun with this but it still looks like too much empty space or something. I didn't really know what to do. It was harder than I expected to make a layout. I had all these nice fall colors in my head that I wanted to use, but they all clashed so bad with the pictures...so I had to use bright colors for a fall layout. Kinda weird I thought, but I guess it works.
Anyway, here it is:
Give me hints on how to improve!
Wednesday, February 27, 2008
BBTB - Spring Card Contest - Entry #2

I made this for a friend who just had a birthday (and I am late getting it to her...oops!) I made a basic criss cross card in the smaller A2 size that I posted awhile back on the Cricut message boards. I stamped the corner flourish in brown (it is a See D's stamp) and then went over it with Glossy Accents. It is hard to capture on camera how it looks in real life. I did not succeed. I free handed the yellow Stickles and added some Liquid Pearls there also. The scalloped circle and two other circles are Cricut cuts. Thanks for looking!
Friday, February 15, 2008
BBTB - Spring Card Contest
For this BBTB contest, we had to make a spring card using pink, orange, yellow, green, and brown. The Cricut cuts are from New Arrival (front) and Walk In My Garden (inside). I had a lot of fun making this card and I hope you enjoy it!
Front:

Inside (on left side...right side is blank):

Front:
Inside (on left side...right side is blank):
Tuesday, January 22, 2008
BBTB - Shape Card Contest
I made two shape cards for two birthdays this week.
The first is for my sister-in-law:

I cut the cake from Celebrations. (I believe the tag was cut from Celebrations as well.) I cut a shadow in blue and regular in white. I cut another in white vellum and Cuttlebugged it with the swirls. I inked that with some silver ink to bring out the swirls. I used Ice Stickles and Stickles to give it some sparkle. I put some tiny blue Primas along the bottom and added some rhinestone bling. I tied the tag on with some cute ribbon.
The next is for my son, who turns two on Friday and LOVES Lightning McQueen:

I cut everything from George. The card is hinged like a hood. The tires are attached to the back of the card. I Cuttlebugged the tires with mesh. This is made mainly of the shapes from the F and D keys (and then circles for the eyes). The picture doesn't do justice to the shine on Lightning McQueen. The Stickles really sparkle.
As many people have asked for directions I am going to add them here from memory...I hope they are right :o) (Sorry for the weird wording as I don't know exactly what to call each of the shapes).
The first is for my sister-in-law:
I cut the cake from Celebrations. (I believe the tag was cut from Celebrations as well.) I cut a shadow in blue and regular in white. I cut another in white vellum and Cuttlebugged it with the swirls. I inked that with some silver ink to bring out the swirls. I used Ice Stickles and Stickles to give it some sparkle. I put some tiny blue Primas along the bottom and added some rhinestone bling. I tied the tag on with some cute ribbon.
The next is for my son, who turns two on Friday and LOVES Lightning McQueen:
I cut everything from George. The card is hinged like a hood. The tires are attached to the back of the card. I Cuttlebugged the tires with mesh. This is made mainly of the shapes from the F and D keys (and then circles for the eyes). The picture doesn't do justice to the shine on Lightning McQueen. The Stickles really sparkle.
As many people have asked for directions I am going to add them here from memory...I hope they are right :o) (Sorry for the weird wording as I don't know exactly what to call each of the shapes).
- Cut two Shift F shapes at 5" in red.
- Cut one Shift D shape at 3 1/2" in red.
- Cut one Shift D shape at 3" in white.
- Cut one Shift F shape at 2" in black. Cuttlebug with mesh embossing folder and cut in half.
- Cut two Shift G shapes at 1" in white.
- Cut one Shift D shape at 2 1/2" (I think) in white. Cut across the bottom corners to make the smile.
- Cut two blue circles for eyes.
- Attach the tires to the back of one 5" red shape. Score the other 5" red shape about 1/4" from the top and attach it to the other 5" red shape.
- Attach the 3" white shape to the 3 1/2" red shape. Attach them to the back of the 5" red shapes.
- Attach the blue eyes to the white that is showing.
- Attach the headlights and smile.
- Decorate as desired.
Thursday, October 11, 2007
Family Tree Template - Now available for download!
I just wanted to let you know that my Family Tree Template

is now available for download on Lulu.com:
http://www.lulu.com/content/1299017
is now available for download on Lulu.com:
http://www.lulu.com/content/1299017
Thursday, October 4, 2007
Kids Card - Go Bananas!

Instructions (All cuts from George Cricut cartridge):
- In brown, cut two circles at 4". Cut two more circles at 1 1/2". Cut two narrow balloons at 3 1/2".
- In tan, cut two 1" circles and one 3" "fat" oval.
- In white, cut two 1 1/4" circles.
- In white, cut slotted tag in desired size.
- Ink all edges.
- Place star brads in white circles for the eyes.
- Draw mouth on 3" "fat" oval.
- Attach eyes and mouth to the front of one 4" circle.
- Attach one 1" tan circle to the front of each 1 1/2" brown circle to make the ears.
- Attach ears to the back of the 4" circle.
- Attach balloons (to form hands/arms) to the back of the 4" circle. (Attach so that when the arms are folded in, they will cover the eyes.)
- Attach the second 4" circle to the back of the decorated 4" circle (inked side out).
- Chalk cheeks and add dots or decoration as desired.
- Set snap/rivet in one side of ribbon. Attach with Zots to one hand.
- Measure length of ribbon (so it will reach the other hand), and cut. Slide slotted tag onto ribbon after writing your message on the tag. Set another snap/rivet in the other end of the ribbon and attach with Zots to the other hand.
- Decorate tag and card with Stickles as desired.
- Use wavy scissors or a scallop cut to make the envelope decoration. Add Stickles and a yellow brad. Draw bananas on the front of the envelope and color with chalk. Add Stickles as desired.
Thanks for looking!
Wednesday, October 3, 2007
Kids Card - "Fishing" You A Happy Birthday

Instructions (All from ZooBalloo & George):
- Cut out a fish bowl at 4" (Real Dial Size On) in blue. Cut the silhouette at the same size (again in blue). Cut the layer at the same size in white vellum.
- Trim off the top of the vellum cut to resemble water waves. Trim the silhouette so only the bottom, outside ring remains (as in picture).
- Cut out grass at 1" in green.
- Cut out fish at 1 1/2" in orange (Real Dial Size On) and another at 1 1/4".
- Cut "(" and ")" out at 2" in brown (Real Dial Size On).
- Cut out envelope at 4" in white.
- Ink edges of grass, fish, fish bowl, and envelope in desired colors.
- Draw bubbles on envelope and ink in desired color.
- Attach grass to fish bowl, trimming to fit the curve.
- Attach white circle (ink edges in desired color and write "Happy Birthday" on it) to the center of the fish bowl. You can cut this from George at 1" or cut free hand.
- Attach vellum to fish bowl only at the edges. Attach fish bowl silhouette to vellum.
- Hook wire through 1 1/2" fish's tail and into one of the "(". Attach the other ")" on top to make the fishing pole. Attach to the fish bowl with a snap/rivet (loose enough to allow some turning). Insert fish into the "water", covering the "Happy Birthday" circle.
- Attach 1 1/4" fish to the envelope flap.
- Use Stickles and Liquid Pearls as desired.
- Cut slotted tag from George in desired size. Ink edges and write "Fishing you a..." on the tag. Thread with ribbon and trim ribbon ends. Attach to fish bowl.
THE END - Enjoy!
Tuesday, October 2, 2007
Pick-A-Present...Coupon Book

- Cut 4 scalloped envelopes from two colors of cardstock at 2 1/2" (ZooBalloo). Assemble, but do not fold down the top flap.
- Cut two scalloped envelopes (one from white cardstock and one from patterned paper) at 3" (ZooBalloo). Remove side flaps. Attach patterned paper to cardstock cut out.
- Cut scalloped squares from Mini Monograms at 2 1/2" (You can also use the scalloped square on the tag from ZooBalloo if you turn Real Dial Size on).
- Cut a slotted tag from George at desired size. Write "Pick-A-Present" on the tag.
- Ink edges of all pieces.
- Set an eyelet at the bottom center of each of the 2 1/2" envelopes.
- Fold the 3" envelope at scoring marks and again 1/4" from the bottom edge scoring marks. This creates a box shape at the bottom of the envelope.
- Set eyelets at the bottom center of the 3" envelope on each side, matching up the height with the 2 1/2" envelope eyelet settings.
- Set an eyelet at the top of each side of the 3" envelope, front and back (see picture for positioning).
- Set an eyelet at the top of each scalloped square.
- Use small ribbon and a ribbon embroidery needle to easily thread ribbon through the eyelet holes. Tie ribbon individually onto scalloped squares. Thread ribbon through the bottom of the large envelope (front) and all the small envelopes and out the back of the large envelope. Thread another ribbon through the sides of the large envelope. Thread both sides of ribbon through the slotted tag you made from George and knot ends (see picture).]
- Write gifts/coupons onto scalloped squares. (Ex: "This coupon good for your favorite home cooked meal.", or "This coupon good for one evening out.", or "This coupon good for one toy up to $5 at your favorite toy store.", etc.)
- Insert scalloped squares into small envelopes or a gift card will also fit if you choose (see picture).
- Tie ribbon from bottom of envelope up and over the scalloped top. Situate the bow behind the George tag.
Other ideas for this arrangement:
- Write reasons why you love someone on the cards and give them your love notes in this cute package.
- Use as a way to do drawings or raffles...each person picks a card from the collection for their prize.
Subscribe to:
Posts (Atom)


