Showing posts with label Market Street Stamps. Show all posts

Tuesday, March 11, 2014

Beauty of Your Dreams

Today's card is one that I created using my Distress Stain/Shaving Cream tutorial to create the marbled cardstock background.
I stamped the image, border, and sentiment on my marbled cardstock background and then added some Matte Black Shimmer twine to finish it off.
I used a stamp set/company that is unfortunately no longer around, but I just liked this card enough that I wanted to share anyway.
Have a wonderful day!

Supplies:
Cardstock: Discount Cardstock (Brilliant White 130#);
Stamps: Market Street Stamps (Dreamcatcher);
Ink: Ranger (Archival - Jet Black);
Twine: The Twinery (Matte Black Shimmer); 

Color Media: Ranger (Distress Stains - Spun Sugar, Victorian Velvet, Spiced Marmalade, Wild Honey);
Other: Barbasol (Shaving Cream);
Tools: Fiskars (Trimmer, Scissors); We R Memory Keepers (Corner Chomper - 3/8" Round); Scor-Pal (Scoring Board);

Friday, August 2, 2013

Love U Mini Album

Today I wanted to share with you the cover of a mini album I created. I haven't added any pictures to the inside of the book yet, but I had a lot of fun doing the cover.
For this album I cut my own covers from chipboard, then covered it with a vintage ledger paper and some various embellishments. The houndstooth on the bottom is fabric (FabRips from American Crafts) - it's the first time I've used FabRips and I love how easy it is to work with! It's already sticky on the back, so the pleating was simple to do. I cut some various patterned papers for the pages inside and bound it all together with my Cinch. 

Thanks for stopping by today!

Supplies: 
Embellishments: Vintage (Mini Playing Card, Sunshine Candy Co. Paper); Recollections (Peach Flower); Seam Binding; American Crafts (FabRips); Studio Calico (Wood Veneer Hearts, Grid Label); Maya Road (Envelope);
Stamps: Market Street Stamps (Believing Butterfly); 
Ink: Ranger (Archival - Jet Black);
Other: Canvas; Chipboard;

Tools: Fiskars (Trimmer, Scissors); We R Memory Keepers (Cinch Binding Tool, Cinch Binding Wires);

Friday, April 26, 2013

Made it to the table!

I was so excited to see recently that one of my cards "made it to the table" as one of the finalists in Paper Crafts Magazine's 2013 Stamping Royalty contest. There were over 1,300 cards received for this contest, so it feels like a big accomplishment just to see my card on that table.
{This is my second year in a row making it to the table - you can see last year's post here.}
{Image from the Paper Crafts Magazine Facebook Page - I added the circle so you can spot my card easily.}

Here's a closer look at the card:
I love simple cards and this was a simple card - cardstock, stamps, ink, and Copic markers. That's it!

Thanks for stopping by today - I hope you have a great day!

Supplies:
Cardstock: Discount Cardstock (Brilliant White 130#);
Ink: Memento (Tuxedo Black);
Stamps: Market Street Stamps (Shine On);
Markers: Copic (Y38, BG15, RV04, Y04);
Tools: Fiskars (Trimmer, Scissors); Scor-Pal (Scoring Board);


Tuesday, April 23, 2013

Blog Hop {The Twinery/Imaginisce}

The Introduction:
If you are hopping along with us today: You should have come here from Jessica Fick's blog. If you did, you are in the right place! Welcome!
If you aren't already a follower, I'd love to have you follow my blog!

If you are one of my regular readers: Thanks for coming back! I love having you! Please join along in the hop - you can start at The Twinery's blog.

The Project:
Although Imaginisce's Good Dog collection has a bunch of adorable dog-themed images, I wanted to take this collection out of it's box and create something a little more 'human'. 
I used various papers from the collection to create this festive birthday card:
The Twinery's Rainbow Teal Shimmer twine was a fabulous way to tie in the beautiful teal color in the Good Dog collection and I love how wrapping it around the sentiment flag just draws your eye in.
If you like The Twinery's Caribbean twine, you will love the Rainbow Teal Shimmer twine! It's the same great Caribbean color (as a solid base) and then it has shimmery rainbow metallic strands twisted throughout. Beautiful!

The Prizes:
The Twinery is giving the winner their choice of 3 spools of twine!
Imaginisce is giving the winner this prize package:
The Details:
Leave a comment on each blog along the hop.
Blog comments close on Saturday, April 27th at midnight (EST) and the winners will be announced on The Twinery's blog and the Imaginisce blog on Monday, April 29th.

Thanks for stopping by today!
This is the last stop for today, but be sure to start back again tomorrow at The Twinery's blog!

Supplies:
Twine: The Twinery (Rainbow Teal Shimmer); 

Patterned Paper: Imaginisce (Good Dog); 
Cardstock: Discount Cardstock (Brilliant White 130#);
Stamps: Market Street Stamps (Great Big Greetings);
Ink: Ranger (Archival - Jet Black);
Tools: Fiskars (Trimmer, Scissors); Scor-Pal (Scoring Board);


Sunday, March 31, 2013

Friday, March 1, 2013

You Are Loved


Here's the funny thing about this card:
It says "You are loved"...but it has taken me quite awhile to come to terms with posting this because I am not sure I love it (or even like it). It is one of those cards that one day catches my eye and the next day makes me want to hide it away.
I don't know what it is about it.

Either way, I hope today that YOU know that you are loved. 
Have a wonderful day!

Supplies:
Patterned Paper: October Afternoon (Farmhouse);
Stamps: Market Street Stamps (Simple Salutations);
Ink: Ranger (Archival - Jet Black);
Pearls: Queen & Co.; 

Other: (Photo turn);
Tools: Fiskars (Trimmer, Scissors, Heart Squeeze Punch); Scor-Pal (Scoring Board);


Tuesday, February 5, 2013

Follow Your Heart {The Twinery}

Hello!
I hope you are joining in on the big Be Our Valentine Blog Celebration over on The Twinery's blog - there are lots of great Valentine ideas being showcased AND some great giveaways!

Today is "Cards & Pages" day and I am playing along - here's my card:
I used The Twinery's Charcoal twine to jazz up this "Follow Your Heart" card.

Be sure to stop by The Twinery's blog to see today's great giveaway - and please come back on Friday (the 8th) to see a fun Valentine decorating idea using The Twinery's twine.
See you soon!

Supplies:
Cardstock: Discount Cardstock (Brilliant White 130#, Black Dungaree);
Twine: The Twinery (Charcoal); 

Stamps: Market Street Stamps (Follow Your Heart);
Ink: Ranger (Archival - Jet Black);
Markers: Copic;

Tools: Fiskars (Trimmer, Scissors); Scor-Pal (Scoring Board);

Wednesday, January 30, 2013

Oh, Happy Day! {The Twinery}

Sometimes I think we get so caught up in life that we might just forget to stop and appreciate the fact that we've been given another day - and we just need to make the best of it!
I love the sentiment "Oh, Happy Day!" - it reminds me that there is something to celebrate in every. single. day.
I tried to keep the design of my card light and fun to echo that joyous feeling. 
And of course the Buttercream twine adds just the perfect little happy touch!

Go ahead and make this a happy day!

Supplies:
Patterned Paper: American Crafts (Dear Lizzy - Neapolitan);
Stamps: Market Street Stamps (Simple Salutations);
Ink: Ranger (Archival - Jet Black);
Twine: The Twinery (Buttercream);
Tools: Fiskars (Trimmer, Scissors); Scor-Pal (Scoring Board);


Tuesday, December 11, 2012

Holiday Greetings {Market Street Stamps}

I recently pulled out the various Winter sets that Market Street Stamps carried just to see what inspired me. Sometimes I have an idea before I start creating and sometimes I pull out stamps and just start stamping until something jumps out at me. 
As I was looking through the sets I noticed that there are SO many beautiful holiday sentiments in various fonts and I wondered if somehow I could turn them into a subway art style card.
Although there are 9 sentiments and a variety of images I only had to stamp a couple times to get the complete look.
I first arranged all of the sentiments on a large stamp block and stamped them in black ink on plain white cardstock. After that there are a few images that can be arranged on a large block to fill in some of the empty space (flourish, lightbulb, button, etc.) - and then and remaining white spaces can get filled in with the smaller duplicate images.
After I had my panel stamped I misted it to give it some holiday sparkle, and then adhered it to the front of my card base.

Happy Holidays!

Supplies:
Cardstock: Discount Cardstock (Brilliant White 130#);
Stamps: Market Street Stamps (Prancer, Essential Holiday Elegance, Ornaments, Shine On, Country Christmas, Christmas Bells);
Ink: Ranger (Archival - Jet Black);
Mist: Heidi Swapp (Color Shine);
Tools: Fiskars (Trimmer); Scor-Pal (Scoring Board);


Friday, December 7, 2012

You Light Up My Life :: Block Party {Market Street Stamps}

It's time for another...
{Be sure to head on over to the Market Street Stamps blog to get all the details about how you can join in on the Block Party...where you can win some fabulous free stamps and have a shot at being a Guest Designer for Market Street Stamps!}

I created this card using the new Shine On set, some white cardstock, and some washi tape. Simple and fun!

Thanks for stopping by today!

Supplies:
Cardstock: Discount Cardstock (Brilliant White 130#);
Stamps: Market Street Stamps (Shine On);
Ink: Ranger (Archival - Jet Black);
Washi Tape: My Craft Channel; 

Tools: Fiskars (Trimmer); Scor-Pal (Scoring Board);

Monday, November 19, 2012

Joy to the World {Market Street Stamps}

For this card I worked with some of the fabulous new Christmas sets from Market Street Stamps: Ornaments and Reason for the Season.

I LOVE those large ornaments that DoBea created. They are great for filling the front of a standard A2 card - and will be great for scrapbooking, mixed media, and home decor as well. 
I paper pieced the ornaments and added a sentiment from Reason for the Season.
{I curved the stamp on my block to go with the curve of the ornament - one of the many benefits of clear stamps!}

Thanks for stopping by today!

Supplies:
Cardstock: Discount Cardstock (Brilliant White 130#); 

Patterned Paper: Heidi Swapp (Vintage Chic);
Stamps: Market Street Stamps (Ornaments, Reason for the Season); 
Ink: Ranger (Archival - Jet Black);
Twine: The Twinery (Strawberry); 
Tools: Fiskars (Trimmer, Scissors); Scor-Pal (Scoring Board);

Sunday, November 18, 2012

Handmade Holidays - Lavender Sachet {The Twinery}

Have you heard about the Handmade Holidays Blog Hop that is going on? 
If not, be sure to head on over to The Twinery's blog to get the details.
{You won't want to miss it - The Twinery is giving away 3 SPOOLS of twine (winners choice) - a $48 value!}

Today I wanted to share with you a fun way to create a beautiful handmade lavender sachet.
I started by taking an ordinary cotton muslin bag and swapping out that boring tie string with some of The Twinery's fabulous Ocean twine.
It was simple to do but it gives it an extra special touch!
To swap out the string I just tied the end of my Ocean twine on to the bag's tie string (while it was still threaded through the top of the bag).
I pulled the tie string to pull it out of the bag, but as I was doing that it was also bringing the twine in and threading it for me. So easy!
I added a bit of color to the bag with mists and then stamped a sentiment onto the bag.
After the bag was decorated (and dry) I took about a 1/2 cup of dried lavender buds and put them in the bag.
I tightened up the top of the bag and added a tag (created from a Fiskars XXL Lever Punch) and voilà!
Easy handmade gift for the holidays (or any other time).
Tip: If you use products that are permanent to embellish your bag you can also use it (without the paper tag) as a homemade lavender dryer bag.

Thanks for stopping by today - and happy holidays!

Supplies:
Twine: The Twinery (Ocean); 

Bag: Celestial Gifts (4x6 Cotton Muslin);
Patterned Paper: Heidi Swapp (Vintage Chic); 
Stamps: Market Street Stamps (Ornaments);
Ink: Ranger (Archival - Jet Black); 

Mists: Ranger (Turquoise); Studio Calico (Bluegrass);
Tools: Fiskars (Tag - 
XXL Lever Punch, Scissors);

Wednesday, November 7, 2012

New Release Blog Hop {Market Street Stamps}

The Introduction:
If you are hopping along with us today: You should have come here from Julie Day's blog. If you did, you are in the right place! Welcome!
If you aren't already a follower, I'd love to have you follow my blog!

If you are one of my regular readers: Thanks for coming back! I love having you! Please join along in the hop - you can start at the Market Street Stamps blog.

The Prize:
Market Street Stamps is giving away one of each of the new stamp sets!

The Details:
Leave a comment on each blog along the hop to be entered to win one of the new release stamp sets.
Full details on how you can win are listed on the Market Street Stamps blog.

Here's the full hop order:
Market Street Stamps
DoBea Alberts
Julie Day
Tifany DeGough <-- You are here
Amy Kolling
Stephanie Muzzulin
Jinny Newlin
Jen del Muro
Stephanie Washburn
Brenda Weaver

The Project:
I used the new Christmas Bells stamp set to create this little gift bag:
You can use it for a gift card or money holder, or just for a small gift or stocking stuffer.
Bonus - it can hang right on the tree so it doubles as an ornament (and doesn't get lost in the shuffle of bigger packages).

Stamping on a cloth bag is similar to stamping on canvas, so there may be a few imperfections in where the ink settles. Even so, I think any recipient would be happy to receive it.
Don't forget - all of Market Street Stamps new releases are currently 15% off in the Marketplace. Be sure to click on over and fill up your cart!

Thanks for stopping by today!

The Next Stop:
Amy Kolling's blog

Supplies:
Stamps: Market Street Stamps (Christmas Bells);

Ink: Ranger (Archival - Jet Black);
Markers: Zig (Carnival Lights Set);
Bag: Celestial Gifts (4x6 Cotton Muslin);

Monday, November 5, 2012

Are you ready? {Market Street Stamps}


Get ready for two fun days of inspiration starting tomorrow on the Market Street Stamps blog!
{But if you just can't wait - new stamps are ready for purchase in the Marketplace now. And...they're 15% off!}

Tuesday, October 23, 2012

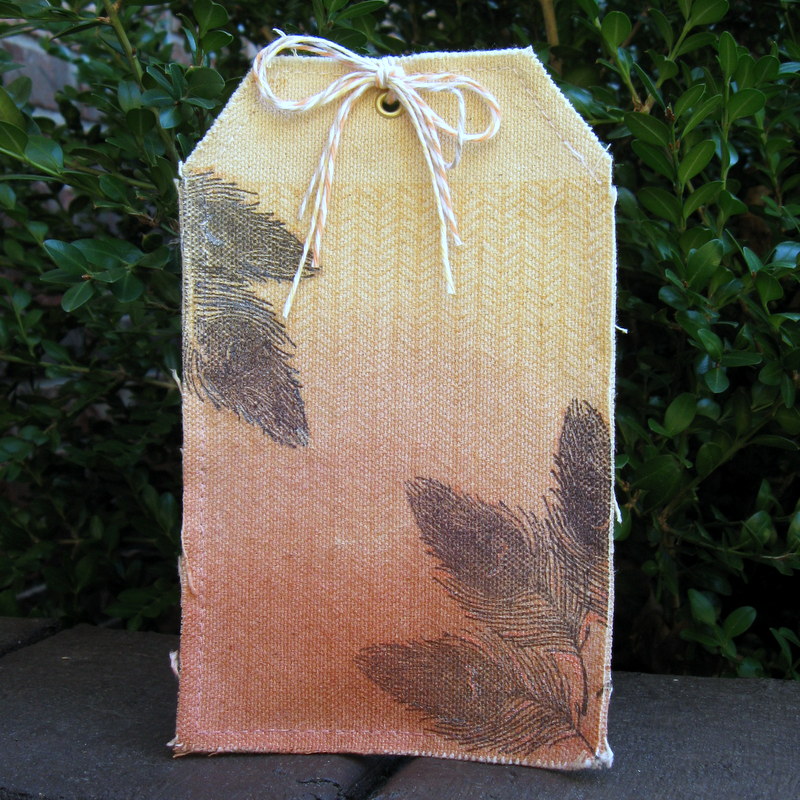
Fall Feather Tag {Market Street Stamps}

Hello there and happy fall to you!

Today I'd like to share a little tutorial for creating a Fall Feather Tag using some stamps from Market Street Stamps and a canvas tag. 

First, let's gather our supplies from the Marketplace:
And from our craft stash:
  • Mists
  • Dye Inks
We'll start by stamping the Funky Herringbone Background Stamp on the tag in a light fall color. 
These canvas tags work wonderfully with the large background stamps from Market Street Stamps. I chose to only stamp it once (so it covers the large base area of the tag and leaves an empty space at the top). If you don't like that look, you can stamp it twice for full coverage (or use one of the mini canvas shapes for full coverage in one impression).
When stamping on canvas you should realize that there are most likely going to be imperfections in the stamping. I think this adds character - but if you can't handle imperfections in your stamping then you can just give this a whirl on a paper tag. ;o)
Next we will give the tag an ombré effect with various mists. For this project I suggest choosing light colored mists in a similar color family/palette. I've chosen three fall-friendly mists that will blend well into each other.
Tip: Always mist on a protected surface. You will have overspray...so unless you want that counter or table misted, cover it up with something like scrap cardboard. 
Stamp the beautiful feather from the new Wild Market Mini with a dark ink. (I'm using a permanent black ink.) 
Stamp it several times varying the positioning. I've grouped it into two clusters, but I also think this would look great randomly stamped all over the entire tag. 
When stamping off the edge of the tag, be sure you are protecting your stamping surface...although I can't deny that a feather stamped desk might just be beautiful. :o)
Finish off your tag with some twine, ribbon, or other embellishments.

This tag would be great to tie onto a big fall gift basket and I also think it would be lovely to create two of these and use them for mini album covers.

What would you use this tag for?

Supplies:
Canvas:
 Canvas Corp. (Canvas Tag);
Stamps: Market Street Stamps (Funky Herringbone Background Stamp; Wild Market Mini);  Ink: Memento (Cantaloupe); Ranger (Jet Black Archival); 
Mists: Ranger (Sunflower Sparkle, Perfect Copper, Interference Red);
Twine: The Twinery (Buttercream, Cantalou
pe, Flax);
Tools: We R Memory Keepers (Crop-A-Dile);